TerraformでAutonomous Data Warehouse (ADW)を作ってみる
今回はTerraform(クラウドに事前に定義した内容の構成・リソースを生成・操作してくれるツール)で Oracle CloudのAutonomous Data Warehouse(ADW)を作ってみました。
Terraformのセットアップ方法はこちら
事前準備
事前に下記の情報を確認してメモ
- プロバイダの設定に必要
- リージョン
- テナントのOCID
- ユーザーのOCID
- APIアクセス用のキーペア
- リソース作成に必要
- コンパートメントのOCID
※以降、上記の情報でマスクが必要なものはxxxに置き換えて記述するので、実際の情報に書き換えてください
定義ファイルの用意
変数定義
・variable.tf
### 環境の変数
variable "tenancy_ocid" {}
variable "user_ocid" {}
variable "fingerprint" {}
variable "private_key_path" {}
variable "region" {}
variable "compartment_ocid" {}

### ADWのサービス関連の変数
variable "autonomous_data_warehouse_db_name" {}
variable "autonomous_data_warehouse_display_name" {}
variable  "autonomous_data_warehouse_admin_password" {}
variable "autonomous_data_warehouse_wallet" {}

###デフォルト定義
variable "autonomous_data_warehouse_cpu_core_count" {
    default = 1 // OCPU単位
}

variable "autonomous_data_warehouse_data_storage_size_in_tbs" {
    default = 1 // TB単位
}

variable "autonomous_data_warehouse_license_model" {
    default = "LICENSE_INCLUDED"
}

variable "autonomous_data_warehouse_state" {
    default = "AVAILABLE"
}

variable "autonomous_data_warehouse_backup_display_name" {
    default = "Monthly Backup"
}

variable "autonomous_data_warehouse_backup_state" {
    default = "AVAILABLE"
}
プロバイダ定義
・provider.tf
provider "oci" {
    tenancy_ocid = "${var.tenancy_ocid}"
    user_ocid = "${var.user_ocid}"
    fingerprint = "${var.fingerprint}"
    private_key_path = "${var.private_key_path}"
    region = "${var.region}"
}
作成するADWインスタンスの設定
・adw.tf
resource "oci_database_autonomous_data_warehouse" "autonomous_data_warehouse" {
#Required
    compartment_id = "${var.compartment_ocid}"
    cpu_core_count = "${var.autonomous_data_warehouse_cpu_core_count}"
    data_storage_size_in_tbs = "${var.autonomous_data_warehouse_data_storage_size_in_tbs}"
    db_name = "${var.autonomous_data_warehouse_db_name}"
    admin_password = "${var.autonomous_data_warehouse_admin_password}"

#Optional
#    defined_tags = "${var.defined_tags}"
#    freeform_tags = "${var.freeform_tags}"
    display_name = "${var.autonomous_data_warehouse_display_name}"
    license_model = "${var.autonomous_data_warehouse_license_model}"
}

data "oci_database_autonomous_data_warehouses" "autonomous_data_warehouses" {
#Required
    compartment_id = "${var.compartment_ocid}"
#Optional
    display_name = "${oci_database_autonomous_data_warehouse.autonomous_data_warehouse.display_name}"
    #state = "${var.autonomous_data_warehouse_state}"
}


output "autonomous_data_warehouses" {
    value = "${data.oci_database_autonomous_data_warehouses.autonomous_data_warehouses.autonomous_data_warehouses}"
}

output "parallel_connection_string" {
    value = ["${lookup(oci_database_autonomous_data_warehouse.autonomous_data_warehouse.connection_strings.0.all_connection_strings, "PARALLEL", "Unavailable")}"]
(オプション)クライアントの資格証明(ウォレット)の設定とダウンロード
これは環境作成時には必須ではないですが、ダウンロードも一緒にしてくれるのでいれておくと便利
・adwwallet.tf
data "oci_database_autonomous_data_warehouse_wallet" "autonomous_data_warehouse_wallet" {
#Required
    autonomous_data_warehouse_id = "${oci_database_autonomous_data_warehouse.autonomous_data_warehouse.id}"
    password = "${var.autonomous_data_warehouse_wallet}"
}

resource "local_file" "autonomous_data_warehouse_wallet_file" {
    content = "${data.oci_database_autonomous_data_warehouse_wallet.autonomous_data_warehouse_wallet.content}"
    filename = "${path.module}/autonomous_data_warehouse_wallet.zip"
}
各値の説明はこちら
プランの作成
プランの作成は $terraform plan で行います。 -out=<プラン名> でプランのファイル出力が可能です。
実行ログ
$ terraform plan -out=adw1
var.autonomous_data_warehouse_admin_password
  Enter a value: <password>

var.autonomous_data_warehouse_db_name
  Enter a value: adwdb1

var.autonomous_data_warehouse_display_name
  Enter a value: adw1

var.compartment_ocid
  Enter a value: ocid1.compartment.oc1..<xxxx>

var.fingerprint
  Enter a value: <xx:xx:xx:xx:xx:xx:xx:xx:xx:xx:xx:xx:xx:xx:xx:xx:xx:xx>

var.private_key_path
  Enter a value: /mnt/c/Users/eminamin/.oci/oci_api_key.pem

var.region
  Enter a value: us-phoenix-1

var.tenancy_ocid
  Enter a value: ocid1.tenancy.oc1..<xxxx>

var.user_ocid
  Enter a value: ocid1.user.oc1.<xxxx>

var.autonomous_data_warehouse_wallet
  Enter a value: <password>

Refreshing Terraform state in-memory prior to plan...
The refreshed state will be used to calculate this plan, but will not be
persisted to local or remote state storage.

random_string.wallet_password: Refreshing state... (ID: none)
data.oci_database_autonomous_data_warehouses.autonomous_data_warehouses: Refreshing state...

------------------------------------------------------------------------

  + create
 <= read (data resources)

Terraform will perform the following actions:

 <= data.oci_database_autonomous_data_warehouse_wallet.autonomous_data_warehouse_wallet
      id:                           <computed>
      autonomous_data_warehouse_id: "${oci_database_autonomous_data_warehouse.autonomous_data_warehouse.id}"
      content:                      <computed>
      password:                     <sensitive>

 <= data.oci_database_autonomous_data_warehouses.autonomous_data_warehouses
      id:                           <computed>
      autonomous_data_warehouses.#: <computed>
      compartment_id:               "ocid1.compartment.oc1..<XXXXX>"
      display_name:                 "adw1"

  + local_file.autonomous_data_warehouse_wallet_file
      id:                           <computed>
      content:                      "${data.oci_database_autonomous_data_warehouse_wallet.autonomous_data_warehouse_wallet.content}"
      filename:                     "C:\\Users\\eminamin\\tflab\\adw/autonomous_data_warehouse_wallet.zip"

  + oci_database_autonomous_data_warehouse.autonomous_data_warehouse
      id:                           <computed>
      admin_password:               <sensitive>
      compartment_id:               "ocid1.compartment.oc1.<XXXXX>"
      connection_strings.#:         <computed>
      cpu_core_count:               "1"
      data_storage_size_in_tbs:     "1"
      db_name:                      "adwdb1"
      db_version:                   <computed>
      display_name:                 "adw1"
      freeform_tags.%:              <computed>
      license_model:                "LICENSE_INCLUDED"
      lifecycle_details:            <computed>
      service_console_url:          <computed>
      state:                        <computed>
      time_created:                 <computed>


Plan: 2 to add, 0 to change, 0 to destroy.

------------------------------------------------------------------------

This plan was saved to: adw1

To perform exactly these actions, run the following command to apply:
    terraform apply "adw1"
実行
実行は$terraform applyコマンドで出来ます。
実行ログ
$ terraform apply adw1
oci_database_autonomous_data_warehouse.autonomous_data_warehouse: Creating...
  admin_password:           "<sensitive>" => "<sensitive>"
  compartment_id:           "" => "ocid1.compartment.oc1.<xxxx>"
  connection_strings.#:     "" => "<computed>"
  cpu_core_count:           "" => "1"
  data_storage_size_in_tbs: "" => "1"
  db_name:                  "" => "adwdb1"
  db_version:               "" => "<computed>"
  display_name:             "" => "adw1"
  freeform_tags.%:          "" => "<computed>"
  license_model:            "" => "LICENSE_INCLUDED"
  lifecycle_details:        "" => "<computed>"
  service_console_url:      "" => "<computed>"
  state:                    "" => "<computed>"
  time_created:             "" => "<computed>"
oci_database_autonomous_data_warehouse.autonomous_data_warehouse: Still creating... (10s elapsed)
oci_database_autonomous_data_warehouse.autonomous_data_warehouse: Still creating... (20s elapsed)
oci_database_autonomous_data_warehouse.autonomous_data_warehouse: Still creating... (30s elapsed)
oci_database_autonomous_data_warehouse.autonomous_data_warehouse: Still creating... (40s elapsed)
(略)

  filename: "" => "C:\\Users\\eminamin\\tflab\\adw/autonomous_data_warehouse_wallet.zip"
local_file.autonomous_data_warehouse_wallet_file: Creation complete after 0s (ID: <xxxxx>)

Apply complete! Resources: 2 added, 0 changed, 0 destroyed.

Outputs:

autonomous_data_warehouses = [
    {
        admin_password = ,
        compartment_id = ocid1.compartment.oc1..<xxxxx>,
        connection_strings = [map[all_connection_strings:map[] high:adb.us-phoenix-1.oraclecloud.com:1522/ar8grq08m8d79by_adwdb1_high.adwc.oraclecloud.com medium:adb.us-phoenix-1.oraclecloud.com:1522/ar8grq08m8d79by_adwdb1_medium.adwc.oraclecloud.com low:adb.us-phoenix-1.oraclecloud.com:1522/ar8grq08m8d79by_adwdb1_low.adwc.oraclecloud.com]],
        cpu_core_count = 1,
        data_storage_size_in_tbs = 1,
        db_name = adwdb1,
        db_version = 18.4.0.0,
        defined_tags = map[],
        display_name = adw1,
        freeform_tags = map[],
        id = ocid1.autonomousdwdatabase.oc1.phx.<xxxxx>,
        license_model = LICENSE_INCLUDED,
        lifecycle_details = ,
        service_console_url = https://adb.us-phoenix-1.oraclecloud.com/console/index.html?tenant_name=OCID1.TENANCY.OC1..<xxxxx>A&database_name=ADWDB1&service_type=ADW,
        state = AVAILABLE,
        time_created = 2019-01-27 13:25:56.61 +0000 UTC
    }
]
出来上がり。
一応UIでも確認してみると・・・
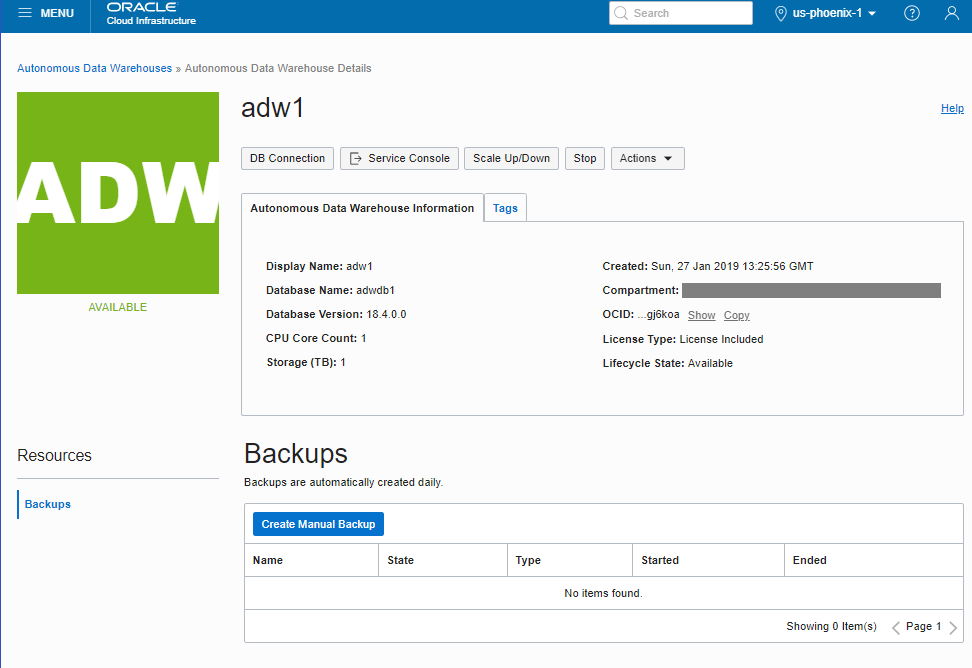
Tips
変数への値の指定方法について
上記の例は、対話式で入力する形でしたが、値の指定方法としては
- 実行時に対話式で入力 <-上記のファイルだけの場合
- コマンドの引数で指定
- 環境変数で指定
- 設定ファイルで指定 の4種類があります。
環境変数で指定する場合
TF_VAR_ を変数名の先頭につけます
・env-vars
### Substitute USERNAME to correct the path
### Substitute the OCIDs, fingerprints and keys with the correct ones for your environment
### File for Linux and OS X Users in shell environment
### Authentication details
export TF_VAR_tenancy_ocid=<テナントのOCID>
export TF_VAR_user_ocid=<ユーザーのOCID>
export TF_VAR_fingerprint=<API Keyフィンガープリント>
export TF_VAR_private_key_path=<API Keyのpemフォーマットの秘密鍵のパス>

### Compartment
export TF_VAR_compartment_ocid=<コンパートメントのOCID>

### Region
export TF_VAR_region=<リージョン> --例) us-phoenix-1
設定ファイルで指定する場合
・<ファイル名>.tfvars (今回はbasic.tfvars)
tenancy_ocid="<テナントのOCID>"
user_ocid="<ユーザーのOCID>"
fingerprint="<API Keyフィンガープリント>"
private_key_path="<API Keyのpemフォーマットの秘密鍵のパス>"
compartment_ocid="<コンパートメントのOCID>"
region="<リージョン>"
autonomous_data_warehouse_admin_password="<DB管理者パスワード>"
autonomous_data_warehouse_db_name="<DB名>"
autonomous_data_warehouse_display_name="<サービス表示名>"
autonomous_data_warehouse_cpu_core_count=<OCPU数>
autonomous_data_warehouse_data_storage_size_in_tbs=<ストレージサイズ(TB)>
この設定ファイルを使ってプランを作成するのは $ terraform plan -var-file=./basic.tfvars -out=adw
環境変数のケースでも、設定ファイルを指定するケースでも 下記の通り実行時に値を聞かれることなく実行できます。
パスワードの自動生成
パスワードは今回は実行時入力する形(対話式)で書いていますが、 ランダムに生成したいという時には、下記を使ってみてください。 outputを入れているので、apply実行時に自動生成されたパスワードが表示されます
resource "random_string" "autonomous_data_warehouse_admin_password" {
    length = 16
    special = true
}

output "autonomous_data_warehouse_admin_password" {
    value = "${random_string.autonomous_data_warehouse_admin_password.result}"
}
まとめ
設定する内容や必要とする他のサービスなどが少ないので、 ADW単体であればTerraformじゃなくていいかなぁというかんじですが、 ひとつのサービス単体で使うケースではなくいくつかのサービスやインフラ設定を含めて、 環境全体を簡単に作成するのに使えるので、その際の参考にしてもらえればと。
そもそもWebUIでの作成方法は???という方は ↓↓こちら↓↓
OCI Database-VMでData Guard構成を作ってみた
この記事は「Oracle Cloud その2 Advent Calendar 2018 - Adventar」の12月23日の記事として書かれています。 記事の内容は執筆時(2018/12/23)のものであり、現在とは異なる可能性がありますので適宜最新状況をご確認ください。
ついに来ました!OCI Database - Virtual Machines(VM)の自動Data Guard構成対応!
Release Notes : Data Guard for virtual machine DB systems (2018/12/14)
Oracle Cloud Infrastructure Database (OCI Database) の自動Data Guard構成
そもそもData Guardって?
Oracle Databaseの機能で、主にデータ保護を目的としたデータベースの自動同期(レプリケーション)機能です。何かあった場合にきちんと切り替えられるように、データの変更情報を元に同期を行うので、ブロックそのものをレプリケーションして破損ブロックまでそのまま伝搬しないような仕組みや、レプリケーション元(プライマリ)・先(スタンバイ)に対して正常なブロックかをチェックしながらレプリケーションを行うことが可能です。Active Data Guardを使うと、スタンバイ側を参照専用で利活用することができます。
どんな構成がとれるの?
OCI Database VMでData Guardを自動構成する場合には、
プライマリ・データベースに紐づけられるスタンバイ・データベースは1つ(1対1)。もっと多くのスタンバイ・データベースを紐づけたい場合には、手動でスタンバイ・データベースを作成することで構成可能です。
プライマリ・データベースのDBシステムと同一のアベイラビリティ・ドメイン内でも異なるアベイラビリティ・ドメインでも配置可能

ということで、早速作ってみましょう
Data Guard 構成を作ってみる
0. 前提条件
事前にプライマリ・データベースの環境を用意
- エディションはEnterprise Edition以上
- Active Data Guardを使いたい場合はEnterprise Edition - Extreme Performance
- エディションはEnterprise Edition以上
スタンバイ・データベース環境の条件
2つのDB Systemが通信可能な状態
スタンバイ・データベースを作る
1.プライマリ・データベースのDBシステム詳細ページを表示
まずプライマリ・データベースの DB System Detail のページのDatabaseの情報を表示します

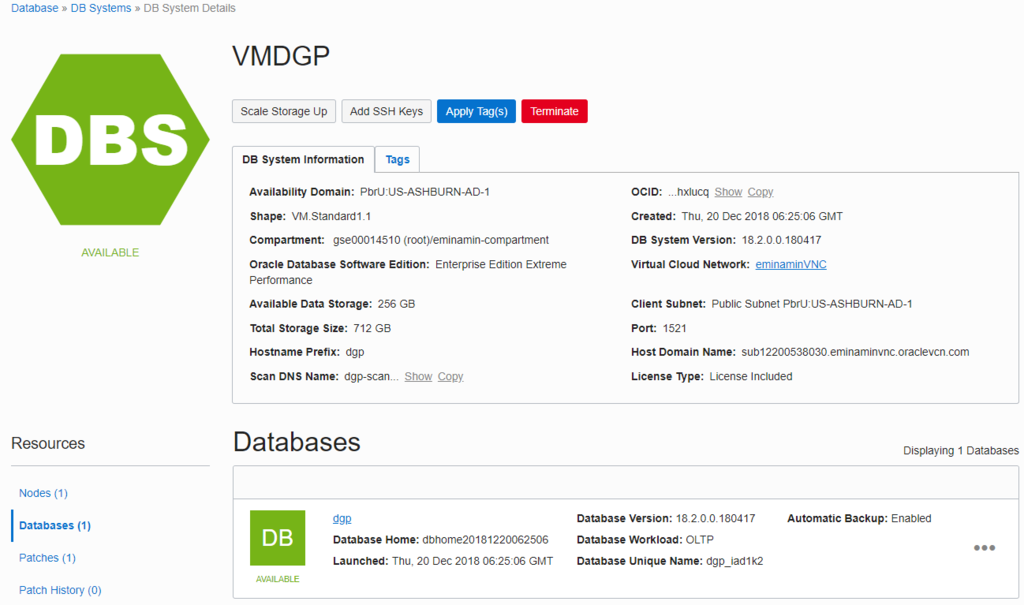
2.Data Guard構成を有効化
右側にある・・・をクリックして、Enable Data Guardをクリック
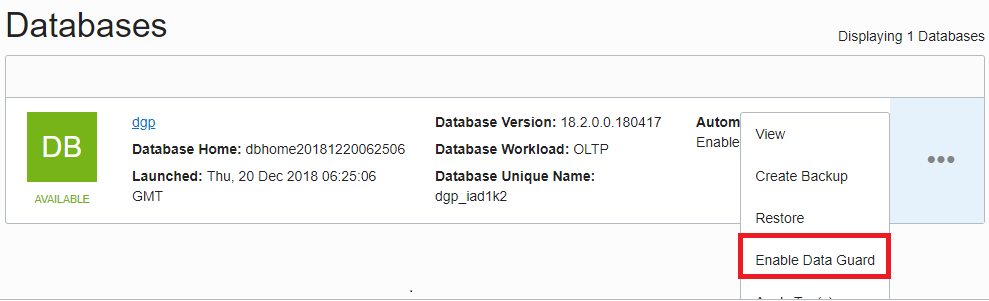
3.スタンバイ・データベース環境の情報を入力
入力する内容は5項目だけ。
- DISPLAY NAME - 任意の名前を入力
- AVAILABILITY DOMAIN - 任意のアベイラビリティ・ドメインを選択(今回はプライマリと別のアベイラビリティ・ドメイン(AD2)を指定しています)
- CLIENT SUBNET - 任意のクライアント・サブネットを選択
- HOSTNAME PREFIX - 任意のホスト名を入力
- DATABASE ADMIN PASSWORD - データベースの管理者パスワードを入力
その他の項目は、選択・入力ではなく情報として表示されます。
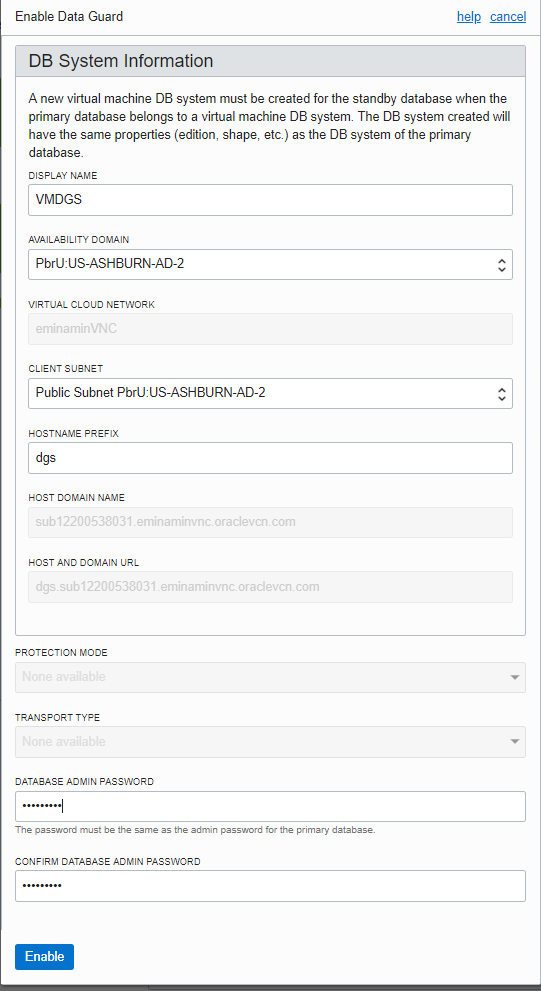
出来上がった環境の状態を確認してみる
出来上がった環境の状態を、コマンドで確認してみます。
さきに結論まとめておくと、こんな構成
- フィジカル・スタンバイ
- 同期が開始している状態
- 保護モードは最大パフォーマンスモード
- Oracle Data Guard Brokerが有効
- (Extream Performanceで作成した場合) Active Data Guard機能が使えるためRead-Only mode でのopen状態=参照可能な状態
・・・要は、全て設定済で、デフォルト構成でよければそのまま使える状態。
自動構成された環境は、Oracle Data Guard Brokerという、Data Guardの管理フレームワーク機能が有効な状態になります。これによって、簡単にData Guard構成の管理や転送・適用状況の情報が確認できます。
- DGMGRL(Data Guard Brokerのコマンド・ユーティリティ)を使って、Data Guard構成を確認
[oracle@dgp ~]$ dgmgrl /
DGMGRL for Linux: Release 18.0.0.0.0 - Production on Sat Dec 22 12:13:54 2018
Version 18.2.0.0.0

Copyright (c) 1982, 2018, Oracle and/or its affiliates.  All rights reserved.

Welcome to DGMGRL, type "help" for information.
Connected to "dgp_iad1k2"
Connected as SYSDG.
DGMGRL>  SHOW CONFIGURATION;

Configuration - dgp_iad1k2_dgp_iad26x

  Protection Mode: MaxPerformance
  Members:
  dgp_iad1k2 - Primary database
    dgp_iad26x - Physical standby database

Fast-Start Failover: DISABLED

Configuration Status:
SUCCESS   (status updated 42 seconds ago)
- スタンバイ・データベースの情報(REDO転送・適用情報など)を確認
DGMGRL> show database dgp_iad26x

Database - dgp_iad26x

  Role:               PHYSICAL STANDBY
  Intended State:     APPLY-ON
  Transport Lag:      0 seconds (computed 4 seconds ago)
  Apply Lag:          0 seconds (computed 4 seconds ago)
  Average Apply Rate: 8.00 KByte/s
  Real Time Query:    ON
  Instance(s):
    dgp

Database Status:
SUCCESS
ここまで自動で構成・設定するのは、手動だと慣れていない人はけっこう大変だと思います。大体REDO転送の設定で皆さんはまりがち。
手動(コマンド)でのData Guard構成作成の速さだけは自信があるので手動構築も好きですが、ここまで設定された状態で使い始められるのは本当に楽だと思います。
OCI Database-VMで選択可能なDatabaseバージョンが増えた話
概要
リリースノート(英語) : Older database release versions available for virtual machine DB system databases(2018.12.17)
OCI Database VM(Oracle Cloud Infrastructure Database - Virtual Machine) のインスタンスを作るときに選択可能なDBバージョンが、少し古いものも選択可能になりました。
実際の画面
こちらは従来からの選択肢
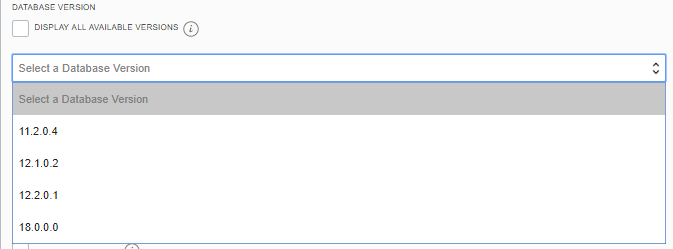
そして、"DISPLAY ALL AVAILABLE VARSIONS"のチェックボックスにチェックを入れると
今回のテーマの古いバージョンも含まれた選択肢
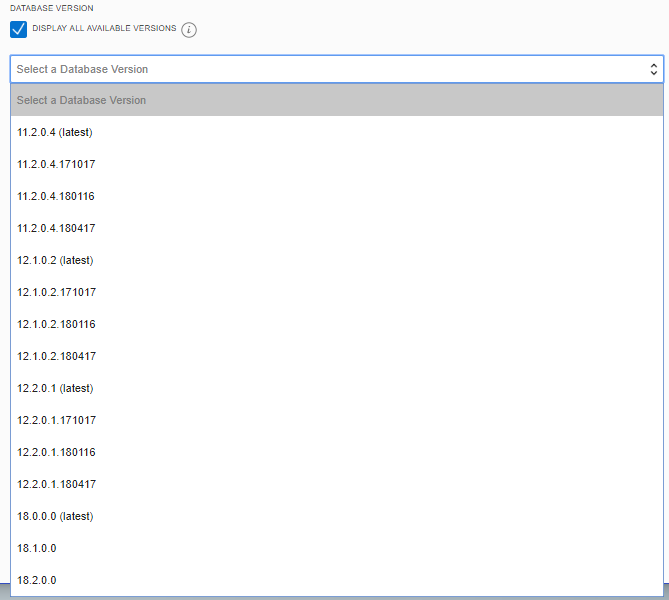
(latest)が末尾についていているものは、そのリリースの最新バージョンになるので、
例えば12.2.0.1(latest)は、12.2.0.1.180417 と同じです。
要は、従来の選択肢=latestです。
マニュアル(英語): Availability of Older Database Versions for Virtual Machine DB Systems
地味に嬉しい、この機能。
従来のインスタンス作成時のバージョン選択は、各リリースの最新バージョン(Patch Set Update/Bundle PatchやRelease Updateが適用済)のみでした。
もちろん最新バージョンで使うのが一番なんです。セキュリティ問題対応等もあるので自分の身を守るためにも。なので、古いバージョンで作った後もどこかのタイミグで新しいバージョンにすることをお勧めします。
とはいえ、選択肢が増えるのは嬉しいですね。
記事の内容は執筆時(2018/12/20)のものであり、現在とは異なる可能性がありますので適宜最新状況をご確認ください。
